Friday, December 23, 2022

Print This Page


Pancakes
Gluten and Dairy Free, Vegan
Adapted from feastingonfruit.com by My Little Blue Heron

Flip 2022 to 2023 with these delicious pancakes!

Pancakes are perfect. Easy and fun to make (kids love to help in the kitchen!), 


(My daughter and grandmother in the kitchen in the 80's)

this recipe will suit most diets: no gluten, no dairy, no eggs and no bananas! This recipe is simple every way. Throw all the ingredients into your blender and give it a zetz! 

You'll need oat flour. (Anthony's is a great brand and it's a large amount. If you prefer a smaller bag, try Bob's Red Mill or Arrowhead Mills.) If this isn't a pantry staple of choice, grind yer oats in a power blender (my Vitamix has a separate dry grains container.) Weigh out the oats first. If you don't have a kitchen scale, get one. Here's an inexpensive one you can buy in the U.S. 

I've been digging ground vanilla over extract of vanilla. It's gluten free, authentic and rich. I like this one. Use half the amount of ground vanilla. Or, use extract!

Unsweetened: omit syrup. Keto, sugar free: try some Lakanto monk fruit maple syrup. Low glycemic and lower calorie.

Dress these up with fresh fruit, apple butter, jam, nut butter, sunflower butter, tahini, or old-fashioned, maple syrup. 

IMHO, never too many pancakes! Why not double the recipe because these freeze beautifully and you'll have them on hand for pancake panic attacks. Before freezing: cool completely on a rack. Layer between sheets of waxed or parchment paper, wrap in heavy duty foil or in silicone or freezer bags before freezing. Reheat, directly from the freezer in a toaster, a toaster oven, your air fryer or microwave oven. 

Simple and simply satisfying. Healthful, too! 

MLBH recommendsget your Covid booster! During this holiday season, it's not a bad idea to mask up again.


Hurray for the January 6th Select Committee!


Here's to hope, peace, return of democracy, love, ease and pancakes!

Happy 2023!
peace and love,
jane

Pancakes
Gluten Free, Dairy Free and Vegan

Equipment: Blender, Non-stick griddle or large non-stick skillet

Ingredients:
½ c. unsweetened applesauce 
1 ¼ c./146g./5.2oz. oat flour (rolled oats, by weight, can be ground in blender)
½ c. non-dairy milk of choice
2 tsp. lemon juice 
2 Tbsp. maple syrup (or liquid sweetener of choice)
½ tsp. baking powder 
½ tsp. baking soda
¼ tsp. salt
1/2 tsp.vanilla powder (heaping!) or 1 tsp. (generous) pure vanilla extract

Procedure:
If you don’t have oat flour on hand, in a blender grind 146 g./5.2 oz. oats to fine flour

Combine all ingredients in your blender and blend until mixed. Batter will be fairly thick.

Heat non-stick pan (MLBH truc: Test drive with one pancake to get heat and cooking time set.)
and, using a pancake pourer (I love mine) or a ladle, pour enough batter (about ¼ to 1/3 cup) onto heated non-stick skillet or flat sauté pan. With the back of a spoon, using q circular motion, smooth into a round pancake.

If batter is too thick, adjust by adding a small amount of milk, a little bit at a time.
This is a thick batter, but it should be thin enough that after a few minutes,bubbles appear and the pancake appears to become ‘dry’, when it’s time to flip to the other side to complete cooking. Remember to begin with a single pancake to get your pancake groove on. 

Yield: 6-8 pancakes 


Thursday, December 22, 2022

Print This Page


Orange Madeleines
Gluten Free
Adapted from Laurent Dran by My Little Blue Heron

These are lovely little cakes, easy to put together, and you can leave the batter in the fridge for a day or two and bake on demand. 

Laurent Dran is my GF guroux. C’est vrai, evolved from its nascent stage, gluten free baking has grown into .. young adulthood. So, in gf context, these are fantastique, parfait, even magnifique!

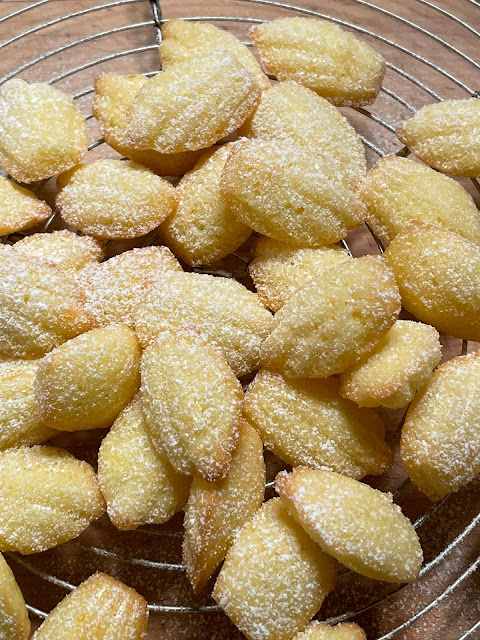
These little pillows are seriously beautiful, truly delicious and will delight you and yours.

Dran’s recipe calls for a final dip in dark chocolate, melted in a bain marie (water bath/double boiler).. or, if you’re adept at nuking chocolate, melt it in your microwave. In the microwave, do take care to melt it at a low power, little by little, stirring often. Allow time for the chocolate to set up before serving or storing. BHK truc: for a pretty chocolate sheen, add a tiny bit of flavorless oil to the melted chocolate. 

I don’t love chocolate (really), and I like to test and taste without the drape or what I consider the mask of chocolate, which definitely hides shortcomings. These cookies are delicious sans chocolate. They’ll hold for a day in an airtight container. If you need to prepare in advance, try the fridge or freeze them.

What’s interesting to me is that despite the absence of butter, there’s a buttery quality to these little cakes. There are eggs, so they’re not vegan. I haven’t tried them using egg substitute. The recipe has no gum binders and if you have a well-stocked gf pantry, it requires no unusual ingredients. What you may need to buy is orange blossom flower water. This is available in specialty markets, middle eastern markets and online. It’s a lovely and fragrant flavoring and it's always fun to have a new flavor in your pantry!

Essential to this recipe: The batter must rest in the fridge for at least two hours prior to baking.

I love my silicone molds. I gave my tins to my nephew. The best ones are from France. They’re made by Lekue. I was lucky to snag their mini madeleine molds. Larger “regular” sized ones are available. 

Ingredients are listed in grams. You’ll need a kitchen scale. If you don’t have one, get one. They’re inexpensive and essential. Here’s a very inexpensive one you can buy on Amazon in the U.S.

I love the mini madeleines. Mini or full-sized, these will be a beautiful addition to your dessert plate, a lovely accompaniment to fruit, or a perfect snack with coffee or tea.

I’m mad for madeleines and hope you’ll be too. You’ll never know they’re gluten free. 

peace and love,
jane


Gluten Free Orange Madeleines

Equipment: Silicone or conventional madeleine tins, electric stand or hand mixer

Ingredients: 

  🟠150 g rice flour (I love Authentic or Bob’s Red Mill)
  🟠70 g potato starch
  🟠170 g 10X (powdered sugar)
  🟠100 g flavorless oil (canola or sunflower)
  🟠2 tsp. baking powder
  🟠Generous pinch of salt
  🟠4 eggs, size large, at room temperature
  🟠1 orange, zested (no pith!), organic if possible
  🟠1 tsp. orange blossom flower water
  🟠For optional chocolate glaze: 100 g 70% dark chocolate


Procedure:

Mise en place: 

In a medium/large bowl, weigh rice flour, then tare. Add potato starch, baking powder and salt. Whisk together and set aside.

Zest orange, taking care to not include the white pith (it’s bitter.) I like to use a Microplane Zester, but a box grater works well, too.

Weigh oil.

Have orange blossom flower water and a tsp. close by the mixer.

In a separate small bowl, weigh 10X (powdered) sugar.

Crack eggs, one at a time and ready them for pouring into batter. No need to mix them.

Prepare the batter:

In the bowl of a stand mixer (or if using a hand mixer, in another separate bowl), beat together the 10X sugar and the eggs until well combined and light in color. 

Add, little by little, the dry ingredients mixture, oil, orange zest and orange blossom flower water and mix until well incorporated.

Essential step: Transfer to a bowl, cover the bowl and put in fridge for at least two hours.

Preheat oven to 375º F. (Dran calls for a much hotter oven, but I had better control and success at a lower temperature. You can go up to 425º if you want to fool around.)

If you’re using conventional madeleine molds, brush with oil. Silicone molds need no coating of fat. I worked both with and without oil, and preferred without. 

Fill molds with batter and bake in center of preheated oven for 6-9 minutes, depending on your molds and your oven. 

Remove from oven, cool enough to remove from molds and transfer to racks to cool completely. 

If dipping in chocolate, wait until cookies are cooled. Dip and cool on racks until chocolate is set. 

Batter can be left in fridge for a day or two, covered well, and baked on demand.

These are best eaten the same day. May be stored in an airtight container for a day. Baked madeleines (not dipped in chocolate) may be frozen. 


Saturday, April 30, 2022

Puffed Buckwheat - Chocolatey!

Print This Page


Chocolate Puffed Buckwheat

Gluten and dairy free (with a vegan option)

Adapted from nourish everyday.com by My Little Blue Heron 


Remember cocoa puffs? These are a little reminiscent, but without the sugar blast or gluten. 


You’ll need to find puffed buckwheat. The first place I found it was at the great shop in NYC called Kalustyan’s. They sell it, but in small batches. You can buy buckwheat puffs from this fantastic resource, Olive Nation. (Explore the site for extracts, baking ingredients and sales!) 


Puffed B'll last for a while. I mix it into yogurt, cottage cheese, and mix it into my other gluten free cereals. It has a nutty taste, its texture is not unlike packing material, but I like it. 


What's cool is this recipe transforms these little puffs into little crunchies, and has them doing "The Tighten Up". Final product is just a tiny bit sweet, delicious and fun! I haven’t tried this with other puffed grains, but you can try this with (untoasted) puffed rice, corn, millet or sorghum (all available at OliveNation.com.)


This fun recipe comes together in a few minutes, and stored in an airtight jar, it’ll last for a at least a month. It’s easy to make and can be a really fun project in the kitchen with your kids!


I prefer using ground vanilla over vanilla extract. I like this brand, but, there are other great choices for pure, ground vanilla. GROUND vanilla quantity rule is 1/2 the quantity of liquid vanilla extract. Instead of adding to wet, mix it into your dry ingredients.


The combination of cacao and carob can be played with. If you don’t have carob or cacao, use cocoa powder. I love carob because it’s naturally sweet (chocolate’s naturally bitter.) Carob is from an evergreen tree indigenous to the Middle East and the Mediterranean. A real carob-perk is that if you get headaches, unlike chocolate, carob won't trigger them.


Take care not to over-bake your cereal. When the baking is completed, the finished cereal won’t be crispy. It'll crisp up as it cools.


I love this liquid coconut oil. It’s easy, flavorless and organic. If you shy from coconut oil, try another flavorless oil, like canola, sunflower or safflower. Or go bold with a dash of nut oil .. hazelnut oil will really complement the chocolatey profile.


Use honey (raw, organic and local is ideal) or for vegan/lower fodmap, I love maple syrup.


puff-peace, and love,

Jane


Chocolate Puffed Buckwheat


Equipment: Bowls, microwave proof measuring cup or small saucepan, two baking sheets, parchment paper


Ingredients:


5 cups puffed buckwheat

1 Tbsp. cacao powder (or cocoa powder)

2 Tbsp. carob powder

1 tsp. ground cinnamon (I like Ceylon)

4 Tbsp. coconut or flavorless oil (liquid, unflavored and organic is great)

4 Tbsp. honey or maple syrup 

2 tsp. vanilla extract OR 1 tsp. pure ground vanilla bean


Procedure:


Preheat oven to 300º F. (150º C.)


Line 2 baking sheets with parchment paper


In a small bowl, whisk together: carob, cacao, cinnamon, and if using, ground vanilla bean.


In a large bowl, measure puffed buckwheat. Add the measure flavors and using a whisk or spoon, stir to combine.


In a microwave-proof measuring cup or bowl, warm (on med-high power) for about 30 seconds, the coconut oil and honey (or maple syrup), and if using, vanilla extract. OR, heat gently in a saucepan. The mixture should be warm and liquid. 


Pour the warmed liquid over the dry ingredients and with a large spoon, stir until combined and well-coated.


Divide mixture on to the two baking sheets and bake for approximately 20-30 minutes, flipping the cereal very gently with a large spatula about half way through the bake. Turn the sheets front to back and top to bottom. This will avoid the outermost edges from burning.


Remove trays from oven and leave on sheets until completely cooled. The cereal will harden and crisp. 


Store in an airtight container. Will keep for about a month.

With Metta, from My Little Blue Heron's Kitchen

Porridge

Print This Page Porridge Adapted from  NY Times article “5 Nutritious Grains Experts Want You to Try” by My Little Blue Heron The origi...

My Little Blue Heron's Arsenal