Sunday, October 13, 2013

Split Pea Soup


Split Pea Soup
Pressure Cooker method
Blue Heron Kitchen

Fall is dancing, there's a blue pumpkin on my doorstep; and soup's on the menu at Blue Heron Kitchen. On the east coast in the U.S., root vegetables are the bounty at farmer's markets. This season, I'm loving the produce from Terry's farms out in Orient Point on eastern Long Island. I dream of their purple and golden carrots and crispy heads of purple Romaine lettuce. I've roasted tomatoes, shucked and boiled corn and steamed and chopped spinach. I've packed, labeled and frozen these gorgeous summer vegetables. I'll have to force myself to pull them out and use them, knowing they'll then truly be gone. But oh, how sneaky, to eat real gutsy spinach in January. 

To quote one of my husbands, "these are the salad days." It's only a matter of weeks before it'll be too cold to open the front door. I'm cooking for those colder days and stocking the freezer with soup. Using seasonal, fresh ingredients will always make your creations taste better. I'm still harvesting and cooking with rosemary, parsley, bay leaves and thyme from my herb garden. I'm drying my rosemary and bay leaves for the winter. 

Pretty soon all the produce at Whole Foods and Fairway and every market everywhere will have a coating of wax and everything will taste like rubber. That's when it's time to eat Twinkies quinoa. So get thee to the greenmarket, start cooking, preserving and freezing. 

If you don't own a pressure cooker, I hope this will inspire you to buy one. You'll love it. Chick peas will cook in 14 minutes. Brussels sprouts in 2 minutes, and you'll have piping hot, ready-to-serve soup in 1/2 an hour. Beyond saving time, you have to believe that the shorter the cooking time, the less you tamper with your food's nutritional value. Here's the one I like. 

This is a hearty soup, one that you can easily serve as a main course. Add salad and bread (regular or gluten-free), and "dassit"! 

Ingredients:

1 pound organic (green) split peas
10-11 cups water (10 for a thicker soup and 11 for a thinner soup)
1 smoked ham shank or ham bone or smoked turkey leg or wing
1 onion, diced (alternatively, whole and then removed)
3 carrots, diced
2 celery ribs, diced
1 small Japanese yam or sweet potato, diced (or 1 medium white potato, diced)
1 Tbsp. fresh thyme, diced (or 1 ½ tsp. dried thyme)
1 parsnip, peeled and cut into a few large chunks
fresh parsley and dill
1 bay leaf
salt and freshly ground black pepper, to taste


Procedure: 

Put all ingredients in your pressure cooker. I use a "soup sock" (a cheesecloth bag). (Those are two different links - I've used both and both are great. The Lieber ones are smaller. I found them in Fairway.) Into my soup sock goes: a whole onion, the parsnip, parsley, dill and bay leaf. Most people love the onion diced, but I don’t. When the soup is done, simply remove and discard the soup bag.

Bring the pot up to pressure (in the Fagor Duo, use the high, #2 setting). Cook for 20 minutes and removing the pot from the burner, use the natural-release method, allowing the pressure to release on its own terms. (This will take an additional 20+ minutes.) Soup's too thin? .. simmer slowly and reduce it on the stove-top. Thick as .. pea soup? .. add water, little by little, stirring over low heat to pea-fection.

If the ham bone was meaty, remove the meat from the bone and throw it into the soup. (Don't bother with meat from a smoked turkey part.) You can always add some diced ham to the finished soup.

Vegetarians, consider adding some veggie hot dogs or sausage/crumble to the finished soup.

Croutons are a perfect garnish. For gluten-free croutons (they’re sold as stuffing cubes), I found some at glutenfreemall.com, a great resource for those who don’t include wheat or gluten in their diets.

Should we always use organic vegetables? Pesticides drain into the soil and surround the roots of our vegetables and fruits. Root vegetables burrow and snuggle into that soil. We both know that buying organic food isn’t always possible and some fruits and vegetables are more vulnerable to sprays. Here's a link to the 'dirty dozen' and 'clean 15' of produce, originally published by the Environmental Working Group. Try baking an organic potato and one that isn't organic and do a taste taste. Make sure they're both the same varietals, say Russet. You'll taste the difference. Organic is almost always more expensive. But getting sick in America isn't cheap. 

Go organic in hyper-moderation. 


BLUE HERON KITCHEN’S SOUP KITCHEN TRUCS:
 
A fat separator (not necessary for this recipe, but for clear soups, a must!)

Cheesecloth soup socks (links above) or cheesecloth
Containers for storing, giving and freezing
Soup stock (a whole world), but if you make it, freeze it in quart containers
Have low sodium soup stocks in your pantry
"Better than Bouillon" stock bases are good (some are organic and some gluten-free), 
      but use sparingly because you'll relinquish sodium control to big brother "BTB"
Always have bay leaves that are either fresh or dried and that are less than one year old
Always have thyme that is either fresh or dried and that is less than one year old
When using water (as opposed to stock), use excellent quality, filtered water.
Don’t be afraid to use salt (unless you need to restrict your intake)


peace-oop and love,
jane


Sunday, October 6, 2013

Carrot Ginger Dressing


Carrot Ginger Dressing
(with gluten-free and sugar-free options)
Adapted from Vitamix “Simplyfresh” by Blue Heron Kitchen


You’re going to love this dressing. You know the ‘orange’ dressing in Japanese restaurants that rocks? This is it, only better.

This dressing or “vinaigrette” is fantastic for dipping veggies, raw, steamed or roasted, as a salad dressing, and as a condiment! Put small dollops on seared scallops or raw or cooked tuna. Mix some into your tuna salad. If you’re not a meat or fish eater, try it in your TVP dishes or with tofu.

The original recipe calls for brown sugar and low sodium soy sauce. For gluten-free and ‘sugar-free’ options, use reduced sodium organic Tamari soy sauce (wheat-free) and dried, organic pitted dates. Cover the dates with some boiled water to soften and plump.

I recently bought a wooden citrus reamer.
It's one of my new joy tools - one I can't believe I haven't always had. It's $5.99, and if you're an Amazon Prime-r, you'll have it in a couple of days, no shipping fee. What a steel reamer.


Process this dressing fine, less fine or coarse. You’re the boss.

Carrot Ginger Dressing
Blue Heron Kitchen


Ingredients:

6 oz. (170 g.) carrot, sliced into ½ inch discs
1 c. (240 ml.) water
3 Tbsp. (45 ml.) rice vinegar (plain, not ‘seasoned’ rice vinegar)
2 tsp. fresh lemon juice (organic, if possible)
4 tsp. low sodium soy sauce
            (For gluten-free, use reduced sodium Tamari soy sauce – organic, if possible. )
4 tsp. sesame oil
¼ tsp. salt
2 tsp. packed light brown sugar
            (For “processed-sugar-free”, while you’re preparing the dressing, cover and       soak about 4-5 pitted dates with boiled water. You’ll remove them from the water before adding.)
1 (heaping) Tbsp. (12 g.) chopped, peeled fresh ginger root

Procedure:

In a small saucepan, place sliced carrots with 2 cups of water. Bring to a simmer over medium heat and cook until tender, about 10-15 minutes, depending on how thin you’ve sliced the carrots. Reserve ½ cup of the cooking liquid for the dressing and drain the rest of the liquid.

In this order, place carrots, cooking liquid, vinegar, lemon juice, soy (or Tamari) sauce, sesame oil, salt, brown sugar (or dates) and ginger into your Vitamix or excellent blender. Secure the lid.

For Vitamix, select Variable 1. Switch machine to Start and increase to Variable 7.

For a very smooth consistency, blend for 20 seconds. Blend less time and lower variable for more control and chunkier dressing.

Chill thoroughly before serving. (The dressing as well.)

More to come from BHK, sans gluten, dairy and night shades ..

I'm working on a miso/tahini variation that will be both marinade (great for fish!) and dressing.

Around the bend: Homemade almond milk!  

peace and love,
jane


Sunday, September 22, 2013

Vitamix!

Vitamix!

Talk to anyone who owns a Vitamix and they’ll profess love and daily use. I’m a recent Vitamixer and although I don’t use it daily (yet), it’s got a box seat, nestled between two important machines.


A Vitamix is an investment (the company offers installment payments, interest-free), but this machine will replace both your blender and food processor. It’s a powerhouse, with its basic motor and apparatus capable of chopping to pureeing virtually anything. I’ve made chopped salad in it, puréed baked winter squash to a thick, creamy consistency, rivaling canned pumpkin; and I’ve pulverized the impossible-to-pulverize lemongrass. Its motor is so powerful that you simply “add nuts” and make nut butter at home.  Add sesame seeds, make tahini. (Aren’t you just the teensiest bit upset by those do-it-yourself nut butter machines in supermarkets. Like, who doesn’t swipe and lick? I do. Ugh. ) I’m going to make my own Chocolate-hazelnut butter – great for gifties.

Think “Ferrari meets John Deere”. Heaven.

I made my own lemongrass oil! I’ll use it for salad oils and for sautéing. (Easy recipe to follow.)

After some information superhighway sleuthing, (Chowhound is a great resource where you can read and add to what dedicated and passionate foodists discuss about anything food-related.) I concluded that the best choice was to buy a refurbished one, directly from Vitamix. Their newest model (the one I chose) wasn’t available on the website, so I called them up (was put on hold for 23 minutes …aaarrrgh!) and after getting an education from a knowledgeable, helpful and pleasant Vita-rep, I placed my order for the next available model and it arrived on my doorstep within a couple of weeks.

This machine comes with (not inexpensive) options and various bells and whistles. You can buy a “dry grains container” ($140!) to grind your own flours at home. BUT, if you do buy your machine directly from Vitamix (even refurbed),  order another container within 40 days, and they’ll cut you a deal and sell it to you for $100 (sports.) I just caved and ordered one. (I want to grind stuff that isn’t wheat because I’m recently deglutinating myself.) I’ll grind my own rice flour and quinoa flour. Maybe chick pea flour too.

In the U.S., you’ll find the Vitamix at shops like Bed Bath and Beyond, Crate and Barrel, Bloomingdale’s; and Costco carries its own model (as does the Home Shopping Network.) I don’t know if Vitamix has gone global. Anyone west of the Hudson know?

There are ‘other’ similar appliances on the market that I’m sure you can buy and that work very well. But if you can go the extra mile, why not? It's a one way ticket, you know? 

The next recipes I post will be for some Vitamix creations. You’ll be able to adapt them for your farty blender or food processor. Look for my easy lemongrass oil recipe and Carrot Ginger Dressing. I’m also working on some miso dressings.


Friday, August 30, 2013

Honey Cake


Honey Cake
(Lekach)
Two New Recipes
Blue Heron Kitchen


If you’re as serious about honey cake as I am, you're going to cheer for these two fantastic, delicious, memorable and important recipes. I can’t decide which I like better. They’re comparable in quality but are as different as Brooklyn and Queens. I think I know which cake I love more (today), but like kids, each different, equally loved. This year, it’s one of the earliest Jewish New Years ever (the 5th of September!). Jewish holidays are never “on time”. You're gonna plotz when you find out when the first night of Hanukah is. 

First: two excellent Jewish baking resources for you: A Treasury of Jewish Holiday Baking by Marcy Goldman, and Inside the Jewish Bakery by Stanley Ginsberg and Norman Berg.

Now, the poop on lekach: honey cake has a bad rep. It’s always on the dessert table because it has to be there; and everyone has to say they hate it.

These recipes will convert nonbelievers and have them swarming around your dessert table.

Okay, let’s lekach!


“Majestic and Moist New Year’s Honey Cake”
From Marcy Goldman’s A Treasury of Jewish Holiday Baking
Adapted by Blue Heron Kitchen


Goldman’s fifteen-year-old book is a home-baker-friendly resource. I found a used copy on Amazon in perfect condition (first edition!)

She writes, “I like a New Year's honey cake to be extra moist and sweet, as good on the day of baking as it is days later. This one is queen of the realm—rich, nicely spiced, in a word, majestic in taste and stature. I went through many variations and tasting sessions until I was satisfied with this definitive cake. One tester gave the ultimate compliment, saying "This one is worth the price of the book." Like most honey cakes, it is a good keeper and can be made a couple of days ahead.” (Translation: it keeps well and you should make it several days ahead because it’ll taste better.)

This cake is a majestic cake. It’s tall, golden and moist. It’s light in texture, and the addition of alcohol makes it one of the most elegant honey cakes I’ve tasted.


Ingredients:

3½ c. all-purpose flour
1 Tbsp. baking powder (I suggest Rumford’s aluminum-free)
1 tsp. baking soda
½ tsp. kosher salt
4 tsp. ground cinnamon
½ tsp. ground cloves
½ tsp. ground allspice
1 c. vegetable oil (I use Canola, whatever you use, make sure it’s odorless .. fresh)
1 c. honey (for this cake, I use Golden Blossom brand honey)
1 ½ cups granulated sugar
½ cup brown sugar (be sure that it’s fresh and moist)
3 eggs, size large, at room temperature
1 tsp. pure vanilla extract (I always use Baldwins!)
1 c. warm coffee or strong tea (I used PG Tips tea one time and Nespresso another)
½ c. fresh orange juice (if you don’t squeeze your own, use the best quality you can buy)
1/4 cup rye or whisky (I used Makers Mark Bourbon) or,  *without alcohol, see below*
½ c. slivered or sliced almonds (optional – please see note at end of recipe)


Procedure:

Equipment:  9-inch angel food cake pan (best) or 10-inch tube or Bundt cake pan, a 9 x 13-inch sheet pan, or three 8 x 4 1/2-inch loaf pans.

Preheat oven to 350°F. Rack in center of oven. Lightly grease the pan(s). For tube and angel food pans, line the bottom with lightly greased parchment paper. 


(it's easy, trace it on the bottom)


For gift honey cakes you might want to get some paper loaf molds (available on amazon.com) and then wrap them in clear cellophane or pop one into a clear cellophane bag.

This cake is “mis-en-place” (“in place and ready for action) perfect. Measure everything out in five vessels (or less) and you’re done. Lightly oil your large (1 qt.) liquid measuring cup and begin with oil, then add honey, followed by orange juice and whisky. Then dump in the eggs and vanilla. Have the sugars measured out. The dry ingredients have been whisked together in the large bowl. Easy. You’re a pro!


If making this by hand, use a large bowl. Using an electric mixer (KA) use its bowl and whisk together the flour, baking powder, baking soda, salt, and spices.

Make a well in the center         


and add the oil, honey, sugars, eggs, vanilla, coffee, orange juice, and alcohol.

Using a strong wire whisk or Kitchen Aid or ‘other’ electric mixer on slow (KA2) speed, combining the ingredients well to make a liquid batter, making sure that all ingredients are incorporated (use a spatula to bring the bottom up to the top.)

Spoon, ladle or pour the batter into the prepared pan(s) and if you’re using nuts, sprinkle them on top of the cake(s) evenly. Place the cake pan(s) on a 2 baking sheets stacked together and bake until the cake springs back when you touch it gently in the center. For angel and tube cake pans, bake for 60 to 70 minutes; loaf cakes, 40 to 55 minutes. For sheet-style cakes, the baking time is 40 to 45 minutes. Cake should spring back when gently pressed.

Let the cake stand for 15 minutes before removing it from the pan. Then invert it onto a wire rack to cool completely. If making this by hand, use a large bowl.

Truc: If you don’t have time to let the cake cool (bedtime?) if the cakes are warm (please, NOT hot), drape a cotton tea towel over them, go wash your face, floss and brush; and in the morning, wrap them up. They’ll keep for days (the taste will improve). You can refrigerate them, but bring to room temperature before serving.

Serves 10-12 

*If you prefer not to use alcohol, replace with orange juice or coffee

Note: In general, garnishing a cake with an ingredient that isn’t inside is confusing, sloppy and deceptive. Slivered almonds scattered on top of honey cake taste good. So much for generalizations.

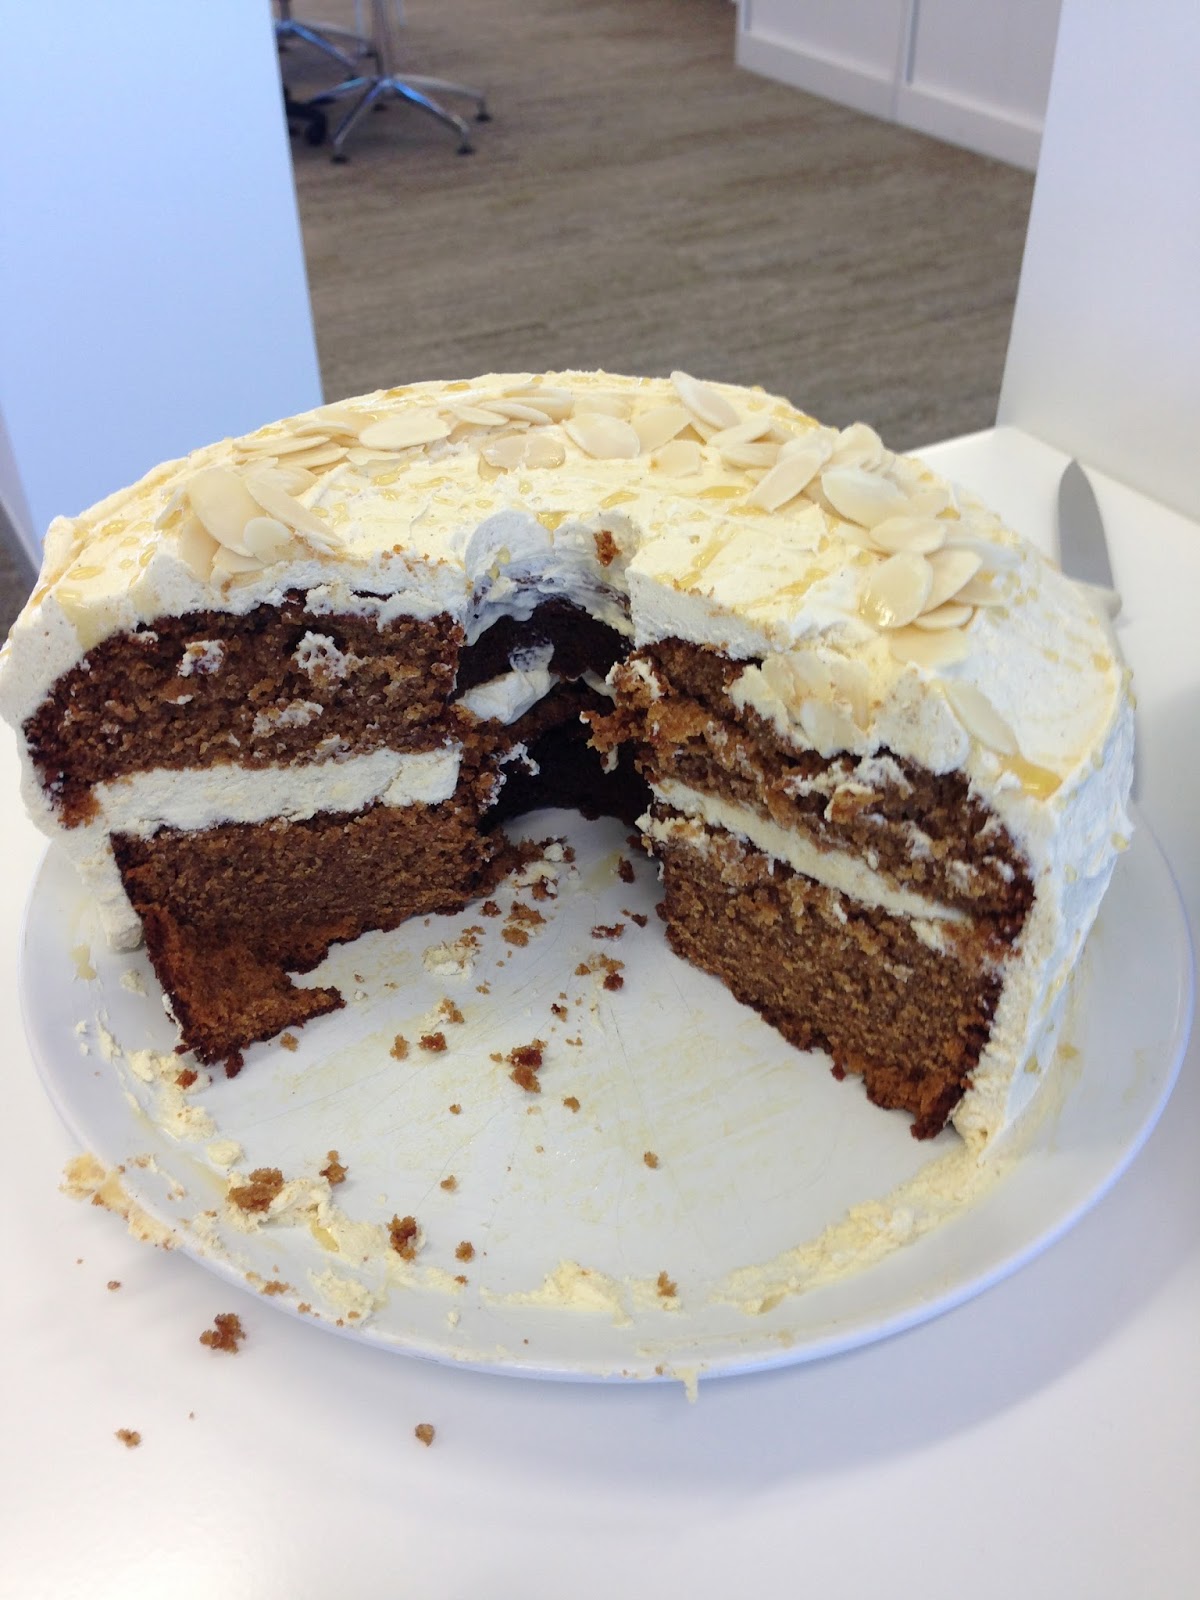
9.13.13 This just in!

My nephew sent this photo of his innovative version, albeit unorthodox (even better!). He baked the honey cake and layered it with a honey-cinnamon buttercream, crowned with sliced almonds. It was a hit at his office, but since his office is in Australia, it was gone before I could get a slice. Looks great, Jacob!


_______________________________________________________________________
_________________________________________________________________


Honey Cake (Lekach)
From Inside the Jewish Bakery by Stanley Ginsberg and Norman Berg
Adapted by Blue Heron Kitchen


The Ginsberg/Berg book is fascinating reading for anyone who grew up eating “Jewish Bakery” (If you can eat “Jewish Deli”, why not “Jewish Bakery”?). The book is a great read, with interesting anecdotes about Eastern European Jewish tradition (Yiddishkeit), scholarly references and a peek inside the obsolete family-owned Jewish bakeries of New York. When you buy the book, get the published “errata” online. Print corrections out and keep them in the book. A mitzvah, those corrections.

These cakes bake for 2 to 2 ½ hours (no kidding) at 225º F. Truc: make sure these are fully baked or you will have sink holes, lines down the middle, instead of crowning loaves. Nobody will talk about you if you bake them at 250º.

What I found intriguing about Stanley and Norman’s honey cake is that it calls for white  rye (no wheat) flour and dark (buckwheat) honey. They write: “Virtually all honey cake recipes in print today call for wheat flour. This recipe uses white rye flour, which was the highest quality flour available in Eastern Europe to all but the very wealthy. …And unlike wheat, which dries out over time, rye, like honey, absorbs water from the atmosphere, so that this cake gets better day by day”.

You can find “White” or “Light” Rye flour online. Order it now. If you’re an Amazon Prime member, you’ll have it day after tomorrow. Here are some links: I bought Bob’s Red Mill on amazon.com because the shipping was cheaper than buying directly from Bob’s Red Mill – sorry Bob. You have to buy a case (four 2-pound bags). The expiration date is a couple of years out. Hopefully, you’ll be inscribed in The Book of Life, and you’ll use it next year (or live in the moment and make a rye bread.) It’s also available directly from Bob’s Red Mill and King Arthur Flour sells it. I doubled this recipe because after going through the trouble to find the rye flour, I wanted to use it. (Important: If you double the recipe, you’ll need a 6-quart Kitchen Aid, or just do it by hand.) Please don’t inquire about substituting dark rye flour. If you do and it works, don’t tell me.

The cake has no orange juice, no extracts, no alcohol or warm “strong” coffee or tea. It’s a no frills commercial (“cummoischul”) bakery recipe, an unusual and extraordinary honey cake. It’s toothsome and with a cup of coffee or a “gleyzele tey” (glass of tea), this cake will make you feel like you’re sitting in your bubbie’s kitchen. (What I wouldn’t give…)

Grandma Rae


Ingredients:
¾ c. brown sugar, firmly packed
1/3 tsp. kosher salt
1/3 c. beaten egg (about 1 ½ size large)
11/3 c. buckwheat (dark) honey* (If you can’t get dark honey, substitute 1.5 oz./40 gr. unsulphered molasses for same quantity of honey.)
½ tsp. ground cinnamon
½ tsp. ground cloves
½ tsp. ground allspice
2/3 c. water (room temperature)
1 ½ tsp. baking soda
4 ½ c. (1 pound) White or “Light” rye flour
1-2 cups whole, sliced or slivered nuts (optional - refer to my "Note" above about optional nuts.)

you'll be astonished at how much honey's left when you turn it upside down

Procedure:
Preheat oven to 225º F./105º C., rack in center of oven. Grease and flour or line with parchment the bottom of two 8 ½ x 4 ½ in./22x12cm. loaf pans.


In bowl of an electric mixer, combine brown sugar, salt, egg, oil, honey and spices and mix using flat paddle beater at low-medium (KA 4) for 6-7 minutes until well blended.
Add baking soda and water and continue to mix until blended.
Add the white (light) rye flour, one cup at a time, blending each addition before adding the next cup. Continue to beat for about 10 minutes. The batter will be loose, stringy and quite sticky.
Pour the batter into the prepared pans and if using, top with nuts.
Bake for 2 to 2 ½ hours (or, if necessary, longer – until tester comes out clean.) Be sure cakes are fully baked before removing from oven (or you’ll have a sunken lines down the middle and forgive me, wet spots.)
Remove to a rack and let cool for 15 - 20 minutes. Run a sharp knife along sides of pan to ease release. Invert, turn back up and cool on racks, completely.
Wrap well and let the cakes ‘season’ for at least one day.


peace and love,
jane


With Metta, from My Little Blue Heron's Kitchen

Honey Cake - Gluten Free (or not)

Print This Page Honey Cake Adapted from Jonah Rosenberg by Blue Heron Kitchen This honey cake was brought to my home by my son and son-in...

My Little Blue Heron's Arsenal