Friday, December 23, 2022

Print This Page


Pancakes
Gluten and Dairy Free, Vegan
Adapted from feastingonfruit.com by My Little Blue Heron

Flip 2022 to 2023 with these delicious pancakes!

Pancakes are perfect. Easy and fun to make (kids love to help in the kitchen!), 


(My daughter and grandmother in the kitchen in the 80's)

this recipe will suit most diets: no gluten, no dairy, no eggs and no bananas! This recipe is simple every way. Throw all the ingredients into your blender and give it a zetz! 

You'll need oat flour. (Anthony's is a great brand and it's a large amount. If you prefer a smaller bag, try Bob's Red Mill or Arrowhead Mills.) If this isn't a pantry staple of choice, grind yer oats in a power blender (my Vitamix has a separate dry grains container.) Weigh out the oats first. If you don't have a kitchen scale, get one. Here's an inexpensive one you can buy in the U.S. 

I've been digging ground vanilla over extract of vanilla. It's gluten free, authentic and rich. I like this one. Use half the amount of ground vanilla. Or, use extract!

Unsweetened: omit syrup. Keto, sugar free: try some Lakanto monk fruit maple syrup. Low glycemic and lower calorie.

Dress these up with fresh fruit, apple butter, jam, nut butter, sunflower butter, tahini, or old-fashioned, maple syrup. 

IMHO, never too many pancakes! Why not double the recipe because these freeze beautifully and you'll have them on hand for pancake panic attacks. Before freezing: cool completely on a rack. Layer between sheets of waxed or parchment paper, wrap in heavy duty foil or in silicone or freezer bags before freezing. Reheat, directly from the freezer in a toaster, a toaster oven, your air fryer or microwave oven. 

Simple and simply satisfying. Healthful, too! 

MLBH recommendsget your Covid booster! During this holiday season, it's not a bad idea to mask up again.


Hurray for the January 6th Select Committee!


Here's to hope, peace, return of democracy, love, ease and pancakes!

Happy 2023!
peace and love,
jane

Pancakes
Gluten Free, Dairy Free and Vegan

Equipment: Blender, Non-stick griddle or large non-stick skillet

Ingredients:
½ c. unsweetened applesauce 
1 ¼ c./146g./5.2oz. oat flour (rolled oats, by weight, can be ground in blender)
½ c. non-dairy milk of choice
2 tsp. lemon juice 
2 Tbsp. maple syrup (or liquid sweetener of choice)
½ tsp. baking powder 
½ tsp. baking soda
¼ tsp. salt
1/2 tsp.vanilla powder (heaping!) or 1 tsp. (generous) pure vanilla extract

Procedure:
If you don’t have oat flour on hand, in a blender grind 146 g./5.2 oz. oats to fine flour

Combine all ingredients in your blender and blend until mixed. Batter will be fairly thick.

Heat non-stick pan (MLBH truc: Test drive with one pancake to get heat and cooking time set.)
and, using a pancake pourer (I love mine) or a ladle, pour enough batter (about ¼ to 1/3 cup) onto heated non-stick skillet or flat sauté pan. With the back of a spoon, using q circular motion, smooth into a round pancake.

If batter is too thick, adjust by adding a small amount of milk, a little bit at a time.
This is a thick batter, but it should be thin enough that after a few minutes,bubbles appear and the pancake appears to become ‘dry’, when it’s time to flip to the other side to complete cooking. Remember to begin with a single pancake to get your pancake groove on. 

Yield: 6-8 pancakes 


Thursday, December 22, 2022

Print This Page


Orange Madeleines
Gluten Free
Adapted from Laurent Dran by My Little Blue Heron

These are lovely little cakes, easy to put together, and you can leave the batter in the fridge for a day or two and bake on demand. 

Laurent Dran is my GF guroux. C’est vrai, evolved from its nascent stage, gluten free baking has grown into .. young adulthood. So, in gf context, these are fantastique, parfait, even magnifique!

These little pillows are seriously beautiful, truly delicious and will delight you and yours.

Dran’s recipe calls for a final dip in dark chocolate, melted in a bain marie (water bath/double boiler).. or, if you’re adept at nuking chocolate, melt it in your microwave. In the microwave, do take care to melt it at a low power, little by little, stirring often. Allow time for the chocolate to set up before serving or storing. BHK truc: for a pretty chocolate sheen, add a tiny bit of flavorless oil to the melted chocolate. 

I don’t love chocolate (really), and I like to test and taste without the drape or what I consider the mask of chocolate, which definitely hides shortcomings. These cookies are delicious sans chocolate. They’ll hold for a day in an airtight container. If you need to prepare in advance, try the fridge or freeze them.

What’s interesting to me is that despite the absence of butter, there’s a buttery quality to these little cakes. There are eggs, so they’re not vegan. I haven’t tried them using egg substitute. The recipe has no gum binders and if you have a well-stocked gf pantry, it requires no unusual ingredients. What you may need to buy is orange blossom flower water. This is available in specialty markets, middle eastern markets and online. It’s a lovely and fragrant flavoring and it's always fun to have a new flavor in your pantry!

Essential to this recipe: The batter must rest in the fridge for at least two hours prior to baking.

I love my silicone molds. I gave my tins to my nephew. The best ones are from France. They’re made by Lekue. I was lucky to snag their mini madeleine molds. Larger “regular” sized ones are available. 

Ingredients are listed in grams. You’ll need a kitchen scale. If you don’t have one, get one. They’re inexpensive and essential. Here’s a very inexpensive one you can buy on Amazon in the U.S.

I love the mini madeleines. Mini or full-sized, these will be a beautiful addition to your dessert plate, a lovely accompaniment to fruit, or a perfect snack with coffee or tea.

I’m mad for madeleines and hope you’ll be too. You’ll never know they’re gluten free. 

peace and love,
jane


Gluten Free Orange Madeleines

Equipment: Silicone or conventional madeleine tins, electric stand or hand mixer

Ingredients: 

  🟠150 g rice flour (I love Authentic or Bob’s Red Mill)
  🟠70 g potato starch
  🟠170 g 10X (powdered sugar)
  🟠100 g flavorless oil (canola or sunflower)
  🟠2 tsp. baking powder
  🟠Generous pinch of salt
  🟠4 eggs, size large, at room temperature
  🟠1 orange, zested (no pith!), organic if possible
  🟠1 tsp. orange blossom flower water
  🟠For optional chocolate glaze: 100 g 70% dark chocolate


Procedure:

Mise en place: 

In a medium/large bowl, weigh rice flour, then tare. Add potato starch, baking powder and salt. Whisk together and set aside.

Zest orange, taking care to not include the white pith (it’s bitter.) I like to use a Microplane Zester, but a box grater works well, too.

Weigh oil.

Have orange blossom flower water and a tsp. close by the mixer.

In a separate small bowl, weigh 10X (powdered) sugar.

Crack eggs, one at a time and ready them for pouring into batter. No need to mix them.

Prepare the batter:

In the bowl of a stand mixer (or if using a hand mixer, in another separate bowl), beat together the 10X sugar and the eggs until well combined and light in color. 

Add, little by little, the dry ingredients mixture, oil, orange zest and orange blossom flower water and mix until well incorporated.

Essential step: Transfer to a bowl, cover the bowl and put in fridge for at least two hours.

Preheat oven to 375º F. (Dran calls for a much hotter oven, but I had better control and success at a lower temperature. You can go up to 425º if you want to fool around.)

If you’re using conventional madeleine molds, brush with oil. Silicone molds need no coating of fat. I worked both with and without oil, and preferred without. 

Fill molds with batter and bake in center of preheated oven for 6-9 minutes, depending on your molds and your oven. 

Remove from oven, cool enough to remove from molds and transfer to racks to cool completely. 

If dipping in chocolate, wait until cookies are cooled. Dip and cool on racks until chocolate is set. 

Batter can be left in fridge for a day or two, covered well, and baked on demand.

These are best eaten the same day. May be stored in an airtight container for a day. Baked madeleines (not dipped in chocolate) may be frozen. 


Saturday, April 30, 2022

Puffed Buckwheat - Chocolatey!

Print This Page


Chocolate Puffed Buckwheat

Gluten and dairy free (with a vegan option)

Adapted from nourish everyday.com by My Little Blue Heron 


Remember cocoa puffs? These are a little reminiscent, but without the sugar blast or gluten. 


You’ll need to find puffed buckwheat. The first place I found it was at the great shop in NYC called Kalustyan’s. They sell it, but in small batches. You can buy buckwheat puffs from this fantastic resource, Olive Nation. (Explore the site for extracts, baking ingredients and sales!) 


Puffed B'll last for a while. I mix it into yogurt, cottage cheese, and mix it into my other gluten free cereals. It has a nutty taste, its texture is not unlike packing material, but I like it. 


What's cool is this recipe transforms these little puffs into little crunchies, and has them doing "The Tighten Up". Final product is just a tiny bit sweet, delicious and fun! I haven’t tried this with other puffed grains, but you can try this with (untoasted) puffed rice, corn, millet or sorghum (all available at OliveNation.com.)


This fun recipe comes together in a few minutes, and stored in an airtight jar, it’ll last for a at least a month. It’s easy to make and can be a really fun project in the kitchen with your kids!


I prefer using ground vanilla over vanilla extract. I like this brand, but, there are other great choices for pure, ground vanilla. GROUND vanilla quantity rule is 1/2 the quantity of liquid vanilla extract. Instead of adding to wet, mix it into your dry ingredients.


The combination of cacao and carob can be played with. If you don’t have carob or cacao, use cocoa powder. I love carob because it’s naturally sweet (chocolate’s naturally bitter.) Carob is from an evergreen tree indigenous to the Middle East and the Mediterranean. A real carob-perk is that if you get headaches, unlike chocolate, carob won't trigger them.


Take care not to over-bake your cereal. When the baking is completed, the finished cereal won’t be crispy. It'll crisp up as it cools.


I love this liquid coconut oil. It’s easy, flavorless and organic. If you shy from coconut oil, try another flavorless oil, like canola, sunflower or safflower. Or go bold with a dash of nut oil .. hazelnut oil will really complement the chocolatey profile.


Use honey (raw, organic and local is ideal) or for vegan/lower fodmap, I love maple syrup.


puff-peace, and love,

Jane


Chocolate Puffed Buckwheat


Equipment: Bowls, microwave proof measuring cup or small saucepan, two baking sheets, parchment paper


Ingredients:


5 cups puffed buckwheat

1 Tbsp. cacao powder (or cocoa powder)

2 Tbsp. carob powder

1 tsp. ground cinnamon (I like Ceylon)

4 Tbsp. coconut or flavorless oil (liquid, unflavored and organic is great)

4 Tbsp. honey or maple syrup 

2 tsp. vanilla extract OR 1 tsp. pure ground vanilla bean


Procedure:


Preheat oven to 300º F. (150º C.)


Line 2 baking sheets with parchment paper


In a small bowl, whisk together: carob, cacao, cinnamon, and if using, ground vanilla bean.


In a large bowl, measure puffed buckwheat. Add the measure flavors and using a whisk or spoon, stir to combine.


In a microwave-proof measuring cup or bowl, warm (on med-high power) for about 30 seconds, the coconut oil and honey (or maple syrup), and if using, vanilla extract. OR, heat gently in a saucepan. The mixture should be warm and liquid. 


Pour the warmed liquid over the dry ingredients and with a large spoon, stir until combined and well-coated.


Divide mixture on to the two baking sheets and bake for approximately 20-30 minutes, flipping the cereal very gently with a large spatula about half way through the bake. Turn the sheets front to back and top to bottom. This will avoid the outermost edges from burning.


Remove trays from oven and leave on sheets until completely cooled. The cereal will harden and crisp. 


Store in an airtight container. Will keep for about a month.

Sunday, December 26, 2021

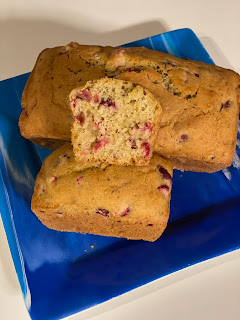
Cranberry Orange Bread - Gluten Free!

Print This Page


Gluten Free Cranberry Orange Bread

Adapted from Colette Martin by My Little Blue Heron Kitchen


I love cranberry bread, and since I was ordered to cut gluten in 2016, this loaf is a taste I've missed. I found this recipe online and tweaked it. It had been stripped of gluten as well as of granulated sugar, dairy and eggs. So, in my quest to recapture the original recipe, I added back as many of those bad boys as I could from the original recipe. Gluten free with crust crunch?!  Crantastic!

Ingredients are listed by weight. Ohhh, please don't sigh or even worse, leave. Here's an inexpensive one, available on Amazon in the U.S. There are so many, and they fluctuate in price. You'll love having this scale in your kitchen. And while you're at Amazon, with Omicron and Delta's dirty dancing, get yourself your very own Covid test! 

I recommend King Arthur "all purpose" gluten-free flour blend (the one without xanthan gum), but if you have a different blend, please do use it.

In New York, you can still find cranberries in the market. Buy a bag or two and freeze! Whole Foods sells frozen cranberries. You only need 1 cup of cranberries for the recipe, so one bag'll last for a few batches. Chop them up frozen and add directly to the batter. Both store bought and freshly squeezed orange juice work well.

I haven't added chopped nuts (yet.) If you do, I'd love to hear from you!

I like to make little mini-loaves and freeze them. You can make a large loaf (8 x 4), smaller loaves, or even cupcakes. 

Like most gluten free baked goods, this loaf is most delicious when cooled and enjoyed, freshly baked. I hope you'll enjoy this old fave as much as I've loved savoring this taste memory.

peace, love and good health to you, 
jane


Cranberry Orange Bread - Gluten Free


Equipment: Loaf pan or muffin pan, mini muffin pans or small loaf pans, hand or stand mixer

Ingredients:
 
340 g. Gluten free flour blend of choice (without xanthan gum) I prefer King Arthur brand
6 g. flaxseed meal
3 g. xanthan gum
12 g. baking powder
2 g. salt
3/4 milk of choice (I use dairy free milk)
1/4 c. orange juice
2 eggs, size large, room temperature
1/3 c. melted butter or mild tasting vegetable oil
149 g. granulated white sugar
1 c. cranberries, fresh or frozen, coarsely chopped
1 1/2 Tbsp. orange zest (no pith!)

Procedure:

1.    Preheat oven to 350º F. Light oil or spray with release loaf pan or line muffin cups with paper liners

2.    In a large bowl, whisk together dry ingredients and set aside.

3.    In the bowl of a stand mixer, or if using a hand mixer, in another large bowl, combine wet ingredients with sugar and eggs, blending until well-combined (about 2 minutes), scraping down, if necessary.

4.    Dump in the blended dry ingredients and blend until smooth. Add chopped cranberries and orange zest. Blend on low until just combined.

5.    Pour into prepared pan or pans. Bake in the middle of pre-heated oven. Time will vary, depending upon size of pan. For one large loaf, approx. 45-55 min. (check after 40 minutes), less for smaller loaves, until toothpick inserted comes out clean.

6.    Release from pan or pans and cool on rack. Serve slightly warm or completely cooled. If wrapping, wait until completely cooled. Wrap and store in fridge or freeze.


Saturday, December 25, 2021

Khichari - Rice and lentil one-pot meal

Print This Page


Khichari

A one-pot grounding and soothing dish

Adapted from Divya Alter by My Little Blue Heron Kitchen


Want to experiment and change up how you're eating? After the parties canceled gatherings, when you're ready to to clean-up your kischkas, simplify, and heal your body, try khichari!

Khichari is known for its soothing and healing properties. Khichari (pronounced "kich-di") is Indian/Ayurveda comfort food. It’s delicious, healthy and after eating chocolate, cookies, pasta, and whatever else fun holiday foods you've enjoyed, this is a great dish to prepare. 

With various ingredients  that you'll have on hand, this is a quick and simple dish to make. It’s easy, inexpensive to prepare, and it's fun to eat! Some folks eat Khichari for a solid week to cleanse.  

Your kitchen will smell like heaven. Once you've made your first pot of khichari you'll want to vary ingredients and spices. (I added some ground fennel to this batch.) The ratio of lentils to rice can be changed, too. If you want to cut down on the rice, use half rice/half quinoa. 

Some basic ingredients for khichari (try to get organic)

·      Yellow split mung dal (lentils)

·      White basmati rice

·      Optional quinoa

·      Ground turmeric

·      Fresh Ginger (Use powdered if you don't have fresh.)

·      Curry or bay ("Cassia") leaves - (Indian bay leaves are different than western bay.)

·      Vegetables: carrots, sweet (not white) potatoes, taro root (also called “edo” root .. buy small, firm ones that fit in the palm of your hand), string beans, asparagus, celery root, daikon radish, leafy greens (like swiss chard or spinach)

·      Ghee (organic if possible)

·      Green Thai chile (the tiny green chile’s you find in Indian markets, and in a pinch, a jalapeno will be fine)

·      Sea salt or if you can get it, “Soma” salt

·      Fresh cilantro

MASALA means 'spice mixture' - and you'll need it!

To make a masala (it's what some people call “curry powder”), you'll need a good grinder. A coffee grinder designated as a spice grinder should do! 

This recipe calls for "Grounding Masala". Click on "masalas" above to link you to the recipe. If you're not feeling motivated, find an all-purpose masala powder. Suggestion: try "Mom's Super Spice Masala".  

I love the addition of green veggies. This stew then becomes a well-balanced one-pot meal. I like asparagus and spinach, too. But you can add whatever greens make you happy!

Serve hot, garnished with a drizzle of olive oil, some freshly ground black pepper and plenty of freshly chopped cilantro along with slices of lime. 

Serve with a chutney of your choice. I love date and tamarind or mint chutney. The lime is a surprise - you'll love it!

peace, love and kichiricoo,

jane


Khichari - Rice and Lentil Stew

Equipment: Spice grinder (to grind spices for your masala!), 4-qt. saucepan with lid

Ingredients:
1/2 c. yellow split mung dal (or red lentils)

1 c. basmati rice

1 Tbsp. ghee (or olive oil, or if you like, sesame oil)

1/2 tsp. ground turmeric

1 Tbsp. grated fresh ginger, or use powdered ginger (use less.) I like sunthi ginger, which is supposed to have magical powers (it couldn't hurt)

6 curry leaves (fresh preferred, but you can use dried - I do all the time) or 2 cassia bay leaves

1 small Thai green chile, seeded (left whole or minced .. your choice!)

2 1/2 tsp. grounding masala (see above link to "masalas")

2 tsp. salt (or to taste .. I prefer beginning with a little less - even half,  and then adding to taste)

2 - 3 (or more!) c. diced vegetables of choice: carrots, sweet potato, edo (taro root), beets, zucchini, green beans, asparagus, leafy greens. If using green beans, zucchini, green beans, asparagus or leafy greens, hold off until last 15 minutes of cooking. 

Garnishes:
Olive oil
Fresh, coarsely ground black pepper
Cilantro


Lime Wedges
Chutney of choice

Procedure:
1.   Soak dal (split yellow lentils) and rice together, for 30 minutes.

2.   Meanwhile, mise en place time! (Measure out everything and have it all ready to go.)

3.   Drain the soaked dal and rice and rinse with cold water, very well, until water runs clear. Drain well and set aside.

4.   In a 4-qt. saucepan, melt the ghee (or other oil of choice) over low heat.

5.   When warmed, add turmeric and stir for just a few second, taking care that it doesn't burn.

6.   Add all other spices, including curry (or cassia) leaves and chile (I leave mine whole), EXCEPT the grounding masala and salt and stir for a few seconds until sizzling. 

7.   Now add the well-drained dal and rice and over medium-low heat, stir until almost dry. 


8.   Add masala, salt and veggies and 4 cups of water. Bring to boil over high heat. Reduce heat to low, cover and cook, stirring every ten or so minutes to make sure the stew isn't sticking to the bottom. Do this for about 15-20 minutes and add water, as needs. (This dish drinks water.) In the end, you'll choose your favorite texture: firm, al dente, creamy or soup.


N.B. If you're adding quicker cooking vegetables, add later, about 15-20 minutes into the cook.

Depending upon your rice and dal (age and humidity in your home), and soaking time, cooking time will vary. You'll know when your perfect consistency is reached. (Keep tasting!)


Garnish and serve hot. If you prepare this in advance, add some water when you reheat. 

Serves 4 very generously.


Sunday, December 19, 2021

Black Eyed Peas (Lobia Masala) for 2022 - Indian "Jain" Style, Vegan

Lobia Masala, (Black Eyed Peas)

No Onion, No Garlic in your pressure cooker

Gluten and dairy free, Vegan

Adapted from Archana's Kitchen by My Little Blue Heron


Some folks like to celebrate the new year with traditional foods (and drink.) Black eyed peas are eaten in some homes at New Year's. I discovered this recipe and it rocks. 

Whether you prepare it for New Year's or Old Year's or any time, it's so delicious. Prepared, these black eyed peas are creamy, comforting and if you're feeling the impact of the current economy, this is a very inexpensive meal to prepare. Black-eyed peas are high in protein and fiber, along with micronutrients such as folate, copper, and thiamine.

Have digestive gripes with legumes and beans?  If you soak the lobia for a full 24 hours, changing the water once, you'll notice a big difference. Some people just can't digest the sugar chains, and I usually have problems with legumes, but I have great success with the long soak, eliminated alliums (garlic and onions), and I also supplement risky meals with these digestive enzymes.

You'll need some ingredients that you can get at an Indian grocer. When all fails, try Amazon! Like: if you can't get fresh curry leaves, try these (from Amazon!) I use them, and they're awesome. I like Kashmir chilli powder, and 'besan' flour is chickpea flour (easy to find.) Tamarind paste? I like Tamicon. And, if you can't find jaggery (I cop to the powdered), use raw sugar or coconut sugar. If you miss the flavor of garlic, try adding some asafetida or "hing", what those folks who don't eat onion or garlic use as a substitute. I have "Best Hing Ever". Beware: it packs a ping.

You might throw in tomatoes, but I stick with the tang of tamarind and opt out of nightshades for this lovely curry.

Here's to your good health, inside and out. Happy 2022 and happy every day, too!

peace and love,
jane


Black Eyed Pea Masala 
"Lobia Masala"


Equipment: Pressure cooker or Instant Pot

Ingredients:
1 cup black eyed peas (lobia), soaked for at least 2 hours, but preferably for 24 hours, with one rinse and change of water

1-2 tbsp. olive or avocado oil

1 inch of fresh ginger, peeled and finely chopped (more if you're a ginger nut)

2 green chillies whole or, seeded and chopped - you're the boss

2 sprigs of curry leaves (or about 12-15 dried curry leaves)

1 tsp. cumin seeds (jeera)

1/2 tsp. turmeric powder (haldi)

1 tsp. red chilli powder (I like Kashmir)

1 tsp. coriander powder (dhania)

1 Tbsp. gram flour (besan) ... chickpea flour

1 Tbsp. tamarind paste

1 tsp. jaggery (or other sugar)

salt, to taste (approx. 1 1/4 - 1 1/2 tsp.)

1/2 c. cold water +  2 c. cold water (more or less)

opt., tiny pinch of hing (asafetida)

coriander (cilantro) for garnish/serving


Procedure:

1. Wash black eyed peas, picking out any stones or foreign matter. Cover with fresh, cold water (by at least an inch or two.) Set aside, ideally for 12 hours. Rinse, repeat and let soak for another 6-12 hours. Drain and rinse.

2.  Have all ingredients measured and ready to go (mise en place.)

3.  Using an Instant Pot, on 'sauté' mode, heat oil. Add cumin seeds, chopped ginger, green chillies, and sauté for a few seconds.

4.  Add the besan (chickpea flour) and the 1/2 c. cold water, stirring constantly to make a smooth paste.

5.  Now, add the turmeric, coriander, red chilli powders, jaggery (sugar), salt, hing (if using), and tamarind paste, followed by the drained and rinsed black eyed peas with about 2 c. water.

6. Stir well, change mode of pressure cooker to "chili/beans" and cook for approx. 15 min. (depending on how long you soaked the beans.) On a conventional Indian pressure cooker: 4-5 whistles on medium heat.
Let pressure release on its own. Adjust consistency and if needed, cook longer. (You will get the knack of this dish after one or two times.)

7.  Check seasonings and adjust.

8.  Serve with: rice, and if you eat gluten, with roti, your favorite chutney, sprinkled with some chopped coriander (cilantro.)


Serves 4


With Metta, from My Little Blue Heron's Kitchen

Gingerbread Granola - Gluten Free

Print This  Gingerbread Granola Gluten Free Adapted from theglutenfreeaustrian.com by My Little Blue Heron A delicious and addictive keeper...

My Little Blue Heron's Arsenal