Showing posts with label King Arthur Flour. Show all posts

Sunday, November 11, 2012

Corn Muffins


Corn Muffins
Adapted by Blue Heron Kitchen
from Carole Walter’s Great Coffee Cakes, Sticky Buns, Muffins & More

This post is dedicated to my friends and former neighbors who live in Long Beach, NY
This blog began because of Bernadette Martin, the Manager of the Kennedy Plaza Farmer's Market
(Back in business on the 21st of November!)
These people were some of the hardest hit and most direly effected by the recent Superstorm Sandy.
 I encourage you to help in anyway you can. 
Click HERE to visit the official site of Long Beach. On the right hand side, you will find a link where you can donate directly to help rebuild the magical "City by the Sea".
Below is a link to the National Red Cross for further donations.


After Sandy hit hard, the following week, we were slammed with a Nor’easter that dumped as much as nine inches of snow on some of us here on the east coast. Compared to others, who lost power for weeks, their homes, belongings, cars and some, their lives, I was fortunate to have only lost power for several days. After replenishing all the spoilt food items, with the new threat of power outages, I pulled out my new butter, new eggs; and I got to work, baking several batches of corn things. 

Corn muffins make life better.


I've never loved corn muffins that have kernels of corn in them, so save your kernels for chowder.

Used to be the best place in town for my corn muffin was The Palace Diner on the corner of Main Street and the Long Island Expressway.
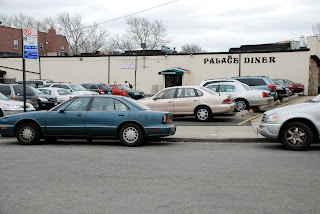


I had my Sunday run in the park/NY Times ritual and my regular booth and great waiter, "Klino".


He knew my 'usual': black coffee and a corn muffin, toasted with butter and orange marmalade on the side. (Okay, sometimes I had poached eggs.)

 Famous people ate at The Palace. Here's someone you might recognize who fell from grace, yet still knew a good corn muffin. Anthony Weiner seized a photo op with my son, while my son was secretly fuming that his feta cheese and onion omelet and onion roll were growing cold.


The Palace is gone. 

It's a Dim Sum Joint. (And it's pretty good .. but no muffins.)


This recipe is sweet and corn-crunchy. 

I like a corn muffin to taste more like corn than cake; and this one has a bold, corn flavor. It’ll shine at breakfast and also be a great addition to your savory bread-basket at dinner (you can reduce the sugar by 1/4 of a cup!)

I encourage you to use Bob’s Red Mill COARSE GRIND Corn Meal, mixed with regular or medium grind corn meal. It adds crunch, fiber and sweetness to these muffins. If you follow the above link to the site, it’s sold in four 24 oz. bags for $8.35. Pretty reasonable, and it keeps quite well. You can purchase it at Fairway Market or at any good independent market that carries Bob’s Red Mill’s line of products.

Always use whole milk when a recipe calls for ‘milk’. It’s also a good idea to use organic milk. It doesn’t come from cows treated with hormones or who have chomped on stuff that are all gmo’d.


When your refrigerated ingredients are at room temperature, they won’t ‘shock’ the daylights out of the rising agents. Bring them all down to room temperature – the milk, the eggs; and even the butter that you’re going to melt will melt faster if it’s out. (Anyone who lived without power for several days or more or who lives outside of this country knows that butter can be left out of the fridge and it will do you no harm – promise.)

These are great the day they’re made, for up to a few days. You can freeze them, so if you want corn muffins on your Thanksgiving Day table, you can start now!

Please remember to donate (click on this link to the Red Cross!). If you’re in the NY/NJ Metro area, you can donate clothes, food, time and money (whichever and whatever you can) to help those of us who have suffered and continue to suffer the damage that Sandy has incurred. Here is a link to the Huffington Post article: Hurricane Sandy: 10 Tips For Donating Smart


Stay warm, charged, gassed up and safe.
peace and love,
jane

Corn Muffins
Yield 24 Muffins (may be halved)

Ingredients:
12 Tbsp./6 oz. unsalted butter (I use Plugra, a higher fat content European style butter)
4 Tbsp. Canola Oil
2 C. Unbleached All Purpose Flour (Try King Arthur)
1 1/2 C. Stone Ground Yellow Cornmeal, spooned and leveled
1/2 C. Coarse Ground Yellow Cornmeal, spooned and leveled
1 C. Granulated Sugar (For a more savory muffin, use 3/4 c.)
2 Tbsp. Baking Powder (make sure it’s fresh!) (And YES, I do mean Tablespoons)
1 ½ tsp. kosher salt
4 eggs, size large, at room temperature
2 C. Whole Milk (preferably organic, at room temperature)
1 ½ tsp. pure vanilla extract (I use Baldwin’s from West Stockbridge!)


Procedure:

1.    Rack in oven to the middle of the oven. Preheat oven to 400º F.
2.    Brown your butter in a heavy saucepan, melting it over low heat. Skim the foam as it forms (it helps to tilt the saucepan toward you!) The butter is ready when it’s a golden brown and it has a nutty fragrance. This should take about five minutes or so. Be careful to not burn the butter!
3.    Pour the browned butter into a glass measuring cup and add the Canola oil.
4.    Spoon a generous ½ tsp. of this mixture into each muffin cup. Use a pastry brush or some waxed paper to spread it around the cup.
5.    In a large bowl (always use a larger bowl than you pull out, you’ll be glad), whisk together all dry ingredients.
6.    In a medium bowl, whisk together the eggs, milk and vanilla extract.
7.     Make a well in the center of the dry ingredients (you can make a wish now) and pour in the wet ingredients, including the remaining butter/oil mixture. (If you’re doing this in two batches, be sure to reserve some butter/oil mixture for the second batch.
8.     Using a large rubber spatula, push the dry ingredients into the center from the sides of the bowl. Do Not Overmix. The batter will be loose and somewhat lumpy (like some body parts appear when you haven’t been exercising regularly.)
9.     Portion the batter into the muffin tin(s) using an ice cream scoop that has a ¼ c. capacity (or use a ¼ c. measuring cup, or wing it). The cups should be almost full.
10.  Bake for 15-20 minutes, until the muffins are golden brown and tops are spongy to the touch. If you’re baking on two racks, be sure to rotate your tins, top to bottom, front to back, half way through the bake.
11.  Place on rack to cool.

Monday, October 8, 2012

Pumpkin Muffins


Pumpkin Muffins
Tiffany Ludwig, Adapted by Blue Heron Kitchen

Time to bake in orange! 
Here’s the first of some pumpkin recipes.

In a recent conversation, my son commented that pumpkin muffins are so 90’s.

In strong defense of pumpkin muffins, and mild defense of the decade, here's some supplemental 90's support: Bill Clinton, The World Wide Web was invented, Ruth Bader Ginsburg was appointed to the Supreme Court, Autocar named the Mini Cooper “The Car of the Century”, and California passed Proposition 215 (medicinal marijuana). How about slap bracelets.

Still too retro? Update your pumpkin muffin wardrobe with 3” ring molds or use financier molds or try baking mini loaves. After all, muffins are basically colonized loaves.

These pumpkin muffins are simple to put together and bake, are dairy-free, have the added nutritional bennies of whole wheat flour without the dense texture or dominating taste of whole wheat, and if they’re not devoured straight away, you can throw them into a Ziploc bag or a plastic container and freeze them.

First time, I made them ‘plain’. They’re great without any additional ingredients. Second time, I played around more and used a 2:1 ratio of white whole wheat to unbleached all-purpose flour and I added walnuts and organic dried apricots. As the temperature outside decreases, the urge to bulk up my muffins increases.

This lovely, warm spice profile complements the squashiness of pumpkin. Grating your own nutmeg is worth the investment in a little nutmeg grinder. Microplane makes a tiny spice plane grater good for nutmeg or cinnamon, or you can buy a simpler, more traditional nutmeg grinder for a few dollars. Buy whole nutmeg and store in a closed container. Grate some fresh nutmeg and take a whiff. You’ll be astonished! (My Spice Sage is a solid resource that  that currently offers free shipping! I urge you to check out this site!) Take a whiff after you’ve grated some fresh nutmeg. You’ll be astonished!

If you don’t have white whole wheat flour (resources: King Arthur Flour, or, Wegman’s, a local supermarket in mid-atlantic NY, NJ, PA, MD and MA), use unbleached white, or combine white and wheat!). I like white whole wheat flour because it (for the most part) doesn’t impart the strong whole wheat flavor to the finished product, while still offering those perk nutrients that whole grains tout.

Finally, generally, I like to double recipes. If you’re making the effort, why not get the most bang for your buck? Not all, but many baked products freeze well; and almost everyone loves to receive something home-baked. Say it with a muffin!

If you’re using canned pumpkin (I use organic canned pumpkin, which is 15 oz….not quite 2 cups, but as they say in music-speak, “close enough for jazz”), one can will suffice for a doubled recipe.

peace and love,
jane

Yield: 12 Muffins or 24 Mini-Muffins

Ingredients:
(c.=cup, tsp.=teaspoon)
1 ½ c. white whole wheat flour (or unbleached white or a combination of white and whole wheat flours)
1 tsp. baking powder
½ tsp. baking soda
½ tsp. salt
2 eggs, size large, at room temperature
1 c. sugar
1 c. pureed pumpkin or ‘other’ pureed orange squash or pumpkin
1/3 liquid c. vegetable oil – canola or grape seed
1 ½  heaping tsps. cinnamon
½  tsp. ground ginger
¼  tsp. ground cloves
½  tsp. ground nutmeg (freshly ground is best!)
optional additions of nuts, dried fruit or chocolate (see below)
optional: Turbinado or finishing sugar for tops

Procedure:
Preheat oven to 350°F. Rack should be in the middle of the oven. Prepare muffin tray(s) with either muffin cup liners or cooking spray. (12 muffins or 24 mini-muffins)

Combine the dry ingredients: flour, baking powder, baking soda, salt and spices; and blend with a whisk.

Either by hand or in your Kitchen Aid (or ‘other’ electric mixer), whisk together the eggs and sugar until light yellow. (The beater blade will work fine in the electric mixer.) Add the vegetable oil and pumpkin and mix until smooth. Add the dry ingredients mixing until just combined. Over-mixing = tough muffins.

Fill all the muffin cups to an equal height. (Optional: sprinkle a little coarse, finishing or Turbinado sugar on the top of each before baking.) Bake until golden and a wooden pick inserted into the center comes out clean, 15-20 minutes for “minis” and 25-30 minutes for full-sized muffins.

Optional additions:
Throw in ½ to 1 c. chopped nuts of your liking, like walnuts or pecans. (Always toast and cool your nuts first. Place them on a cookie sheet and toast them in a preheated 350º oven for about 6-8 minutes, until you can just smell them. Take care to not let them burn. If they burn, don’t use them – they’ll ruin whatever you’re baking. Cool before chopping.) Toasting nuts brings out their natural oils and makes a difference in the finished product.  Try tossing some into a salad!

Add some dried fruit, like raisins or chopped apricots or dried cherries. You can combines some with the nuts. Try ½ c. dried fruit and ½ c. chopped nuts, combined.

If you’re a chocolate lover, fold in ½ - ¾ c. chopped excellent quality chopped chocolate, or some excellent quality chocolate chips. I like Guittard or Ghirardelli. Mini-muffins? … one or two chips might become the muffin … so, if your chips are bullying your batter, chop them up. You’re the boss. 


Saturday, October 29, 2011

Chocolate "Gold Coast" Globs

After a foot of snow blanketed Colorado last week, shutting down businesses and schools and with the arrival of snow and sleet, accented by a few cracks of thunder in New York City today, I suggest: Soyez prêtes! ('Be prepared!'). 


In kitchenese: mis en place (pronounced: meeze ehn plahsuh) 


So, when it comes to the baking of these fantastic globs that fall somewhere between a brownie a cookie and a "chunky", the situation is that everything you're going to need is pre-measured and ready, like you had an imaginary apprentice doing all the dirty work while you were in make-up getting ready for the shoot.* 


*You can't tell me that you never forgot something like the sugar or,say, doubled the butter and not everything else (as I just did - I'm serious).


Stay warm and dry. Eat a little chocolate. And wherever you go, "soyez prêtes"! 


Chocolate “Gold Coast” Globs
Adapted from Judy Rosenberg’s Baking book by Blue Heron Kitchen


Here’s another great recipe that I’ve added a couple of my own twists to that originates from Judy Rosenberg’s All-Butter (etc.) Baking Book. I’ve learned from her publicist that she’s about to come out with a new book soon. I can’t wait to get my hands on it!

It is CRITICAL that you allow for the chocolate and butter mixture to cool sufficiently or else you will wind up cooking your eggs.

Use excellent quality chocolate. It matters. I use Scharffen berger unsweetened chocolate and Jacques Torres’ dark chocolate discs, chopped, for my ‘chocolate chips’. These links are suggestions. You can purchase Scharffen berger chocolate in better stores, such as Fairway Markets and Jacques Torres has his own stores in NYC - in DUMBO, Chelsea Market and other locations too. Look for these products and discover your own chocolate treasures in your own necks of woods. Or go online and order through Amazon.

I have used both walnuts and pecans, but you can stick to one. If you love one and hate the other, knock yourself out. Today, I burned my walnuts, so my cookies had only pecans and they were pretty great.


Always toast and cool your nuts before you bake. Toast them at 350º F. for about 6-8 minutes, until you can just smell them. Watch them carefully. If they burn, they’re toast. You can play around and try a combination of chopped chocolate, nuts and even some dried fruit.

The globs freeze very well. So, if you’re starting to panic about Thanksgiving, you can bake these now and freeze them between sheets of parchment or wax paper (I love wax paper) in plastic containers, tins or freezer bags. (For anyone with a chocolate kupf, they’re stupid good frozen.)

Ingredients:

5 oz. semisweet chocolate (Scharffen berger or another good quality chocolate)
3 oz. unsweetened chocolate (same as above)
4 oz. 83%, European style butter, at room temperature (Plugra brand is a good one)
¾ c. all-purpose, unbleached flour (King Arthur or Bob’s Red Mill are fine examples)
1 tsp. baking powder (I use Rumford - sans aluminum!)
½ - ¾ tsp. kosher salt (depending on how much salt you want with your chocolate)
2 eggs, size large, at room temperature
2 tsp. pure vanilla extract (I use Baldwin’s vanilla – always)
1 Tbsp. instant espresso powder
¾ cup granulated sugar
¾ c. semisweet chocolate ‘chips’ (or chopped excellent quality, such as Jacques Torres discs)
1/3 c. chopped pecans (first, toasted and cooled)
1/3 c. chopped walnuts (first, toasted and cooled)

Procedure:
Here is where the mis en place brings you great satisfaction.

Carefully measure out all of the ingredients for this recipe.

You’ll just dump one thing in after another and this recipe will feel like you ripped off the box top of like, a box of Ghiradelli Ultimate Fudge Brownies.

1.                     Put the semi and unsweetened chocolates and butter in a stainless bowl, large enough to accommodate them; and set it atop a barely simmering pot of hot water. Take care that NO steam or hot water gets jiggy with the chocolate/butter mixture. Stir and melt. Remove to COOL.

2          Preheat oven to 325º F. and line 3 baking sheets or ½ size sheet pans or jelly roll pans with parchment paper. If you don’t have parchment paper (you should get some), grease the sheets with melted butter or brush them lightly with vegetable oil. Set aside.

3.         In a small bowl, whisk together the flour, baking powder and salt. Set aside.

4.         Using an electric mixer, beat the eggs, vanilla and coffee powder until blended.

5.         Add granulated sugar and blend until thick. 1-2 minutes.

6.         Add the cooled , melted chocolate/butter mixture and blend another minute or two. Scrape down the bowl as necessary. (If you have a silicone beater blade, this won’t be necessary!)

7.         Add the flour mixture, mixing on low speed, until just incorporated. No more than that, please. Fold in the chocolate ‘chips’ and nuts by hand or with the mixer, on low speed.


8.         Drop the dough by rounded spoonfuls (I use a small measured scoop), leaving a couple of inches between, onto the prepared sheets.

9. Bake, rotating the sheets,  between the racks, turning them too, about 10-13 minutes, until they rise slightly and form a thin crust. Immediately remove the cookies from the sheets (you can leave them on the parchment) and cool on a rack.       

Yield: 24-36 cookies, depending on how globular you go                 


With Metta, from My Little Blue Heron's Kitchen

Honey Cake - Gluten Free (or not)

Print This Page Honey Cake Adapted from Jonah Rosenberg by Blue Heron Kitchen This honey cake was brought to my home by my son and son-in...

My Little Blue Heron's Arsenal